Tuesday, August 30, 2016

Bolt Action V2 first game

V2 is still a couple of weeks off release date & we haven't got a copy, but we figured we'd gleaned enough info from the net to play a game near enough to V2.  This the result of our research - mostly from the video referenced from the Warlords weekly email.


Camp Cromwell’s unofficial list of changes in v2
Item
Details as we think they are
Friendly Fire (Barrage)
Random direction 2D6”
Template for HE
Diams are: 1”, 2”, 3”,4” for 1D2/3, 1D6, 2D6, 3D6
Fire at houses still use the D
AA fire
Made effective
Rally Test
Don’t count -1 per pin in Command Test
Staying Down
-1D3 pins if staying down at end of turn
MG’s +1 dice
LMGs 4, MMGs 5 (incl. vehicles)
LMG range
Now 36”
Vehicle MG
Generally have co-driver to fire it
Reece Evade
Only if not already activated this turn
Commander
Activates other units within 6”.  
1, 2, 3, 4 units for 2ndL, 1stL, Capt, Maj.
Double 1 Command Dice
Take off 1+D6 pins
Dense Terrain
Can see into it, but not thru it
Assault Rifles
Range 18”
Assault special rule
Re-roll hits for another hit (instead of 2x dice)
Pins in Assaults
Not removed after assault adjudicated
Shaped Charge
No -1 to hit
Snipers
No +1 to hit. Can’t snipe at less than 12”.
Flamers
Need 3+ to hit (no cover modifier)
Scenarios
More of them


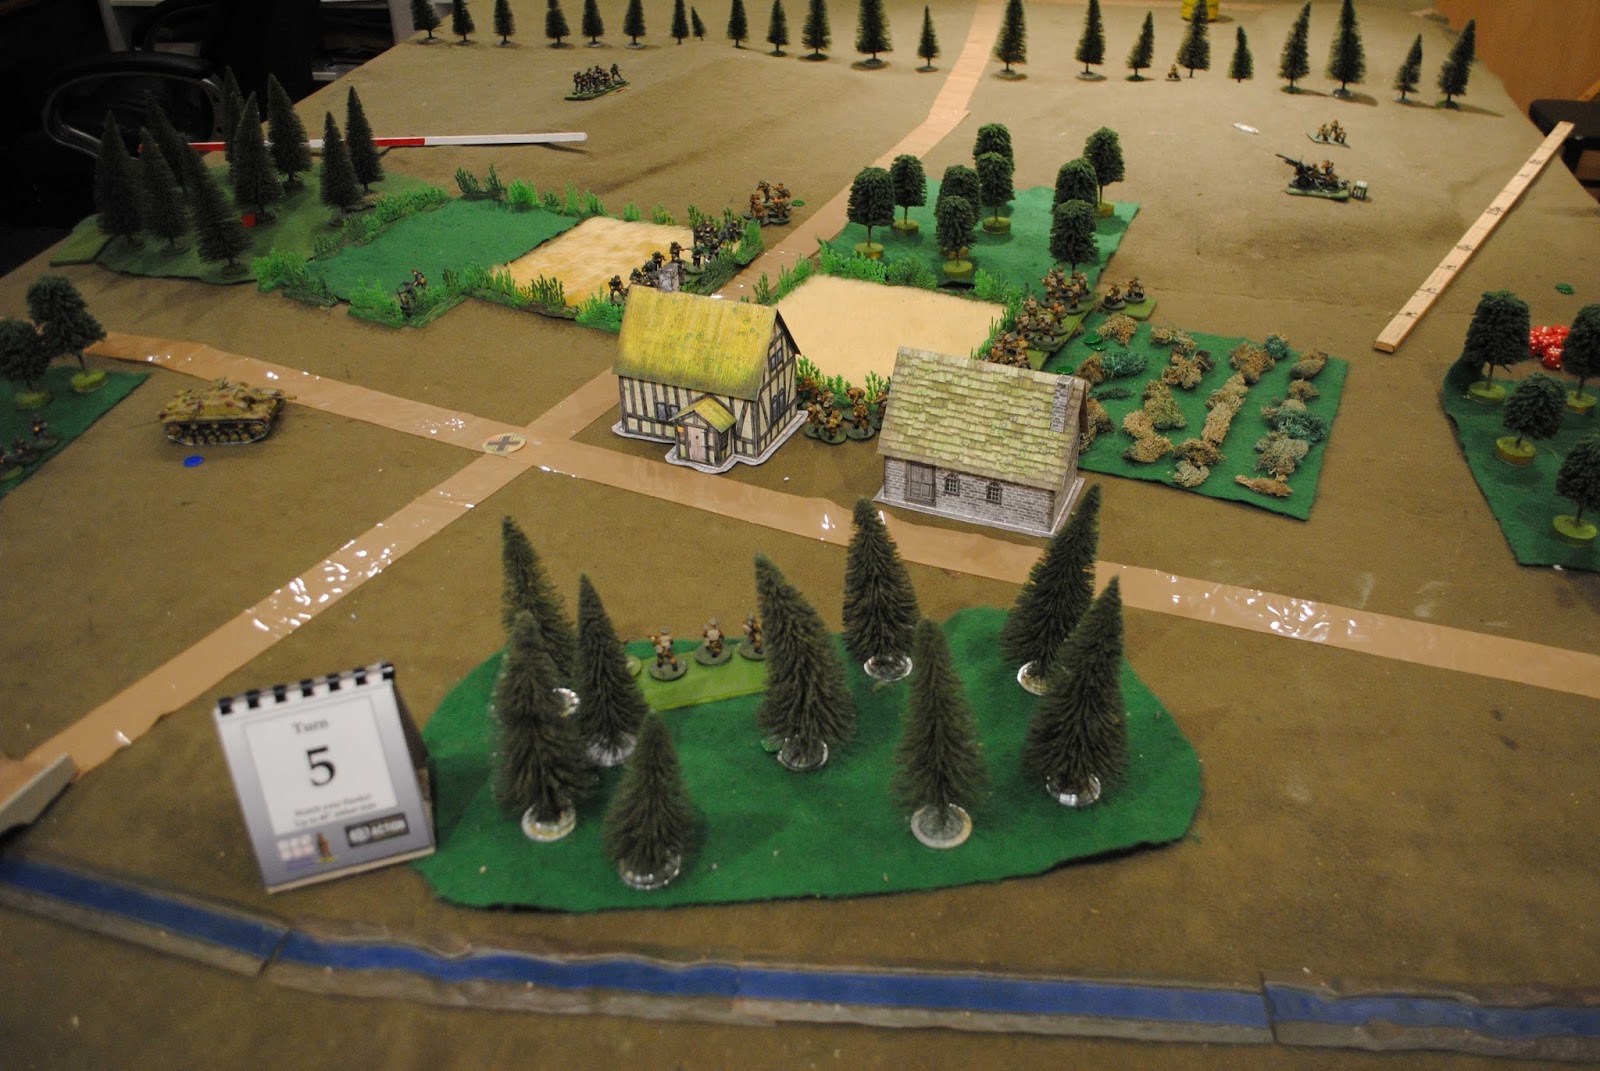
The scenario we played is Surrounded - the defender starts with half their army in the centre of the table.  The attacker's first wave comes on turn 1, both sides reserves from turn 2.  Units can be brought on from any edge, but not the same edge as the enemy's last reserve.  To win you have destroy 2 more enemy units than you lose.
The Brits are the defenders.  The Germans tried to rush their position from the near side with mounted Panzergrens in the first wave.  But the Brits had got two units into ambush before the infantry dismounted & while the Germans wiped out the Brit MMG, they were then badly shot up themselves.  
The freedom to bring on reserves on any edge subject only to not being the same edge as the enemy's last reserve is maybe a bit gamey, but it can lead to scary sideplots.  The German mmg wiped out the 25 pdr on the LH ridge, but got wiped in turn by infantry from the half track.  On the left the bug with PIAT crew took on the German HT's.  The 251 had to retire, but the Stummel got lucky, killed the Piat crew leaving the Carrier isolated nearer enemy than friends & so it was also lost.
The Germans had pretty well given hope of victory on turn 2, but formed a defensive line in the woods and desperately tried to hang on for draw.  
The British barrage came late but took out a unit when it did.  Somehow, despite going to 7 turns, the Germans held on with 1 unit of 1 man, 1 of 2 and the 3 men & the 2 HTs surviving out of 9 units (small units of vets hiding the woods are hard to finish off).  The Germans had lost 5 units but they had taken out 4 Brits so salvaged a draw.

It was very enjoyable game and we had no problems adjusting to the new rules. We can't be sure we've got all the new rules right, but we think that Warlords seem to have done a pretty good job of V2.  Not all the new rules came into play, but those that did worked fine. 

Saturday, August 27, 2016

Saturday afternoon Bolt Action at Good Games

This afternoon's Bolt Action session at Good Games was our best yet with about a dozen punters taking an interest & 3 games played with new players teamed up with old hands to learn the game.
Bolt Action looks like it might be taking off in Hobart with Good Games keen to promote it.  As well as the Operation Cromwell one day tournament in October plans are at afoot for a escallation league at Good Games, probably on Wednesday nights. Version 2 of BA is due out next month - an inconvenient 4 weeks before Operation Cromwell so maybe too soon to use then, but no decision has been made yet.

Napoleonic: El Perez-ish

An away game at Dave's place.  He set up a scenario based on the El Perez scenario in the Black Powder book.

Brits: Mike & PeterC: 
4 inf divs & a cav div.  Command 8, CIC 9.
Objective to get at least 3 divs over  the bridge.

French: Jim, Chris & Dave:
3 inf divs & a cav div. Command 8, CIC 9.
1 hussar unit was on the far side of the bridge, 2 more can come on a British flank when the dice are right.
Objective Destroy the Brits before they can get across the river.
 The French have come onto the near edge of the table.
The French advance was plagued with poor command dice that allowed the Brits to get a good start back towards the bridge & set up a reception committee for the flanking hussars - half of them were broken before they even charged home.  The British artillery has driven the hussars back from the bridge. French dragoons have charged down the road to try to pin some infantry down, but the infantry has been slow to come up in support.  

All the French hussars have been broken while the dragoons have failed to break the square.  Rifle & artillery fire has whittled away at the advancing infantry, but 2 divs are finally getting close.
The British have a division crossing the bridge.  The French dragoons have bounced off the square. Finally the French infantry have engaged on both flanks, but their column attacks did not go well, failing to break thru.  On the right the French have now formed line.  Their 3rd div is still not up to the front.

The Brits suddenly decided they were doing well enough to win the battle on the field & revered their retreat over the bridge.  The French thought they were making a mistake as they renewed their attack with a fresh second line against shaken troops.  Alas, good tactics don't work when the dice gods are against you and on both flanks fresh units broke charging shaken line.  Instead Brit divs breaking, the French divs was now on the verge of doing so& the British change of plan suddenly became a stioke of genius - very Wellington.
The Brits now counterattacked with a vengance charging their cavalry through through a gap in the line, pushing fresh troops up to the front & assembling a grand battery.  The cavalry charge did not go well being halted by hot shooting by the artillery, but it distracted French infantry from the main game and was a good move regardless.
The only French success at this stage was to finally break the British div on their right - which was a very mixed blessing in that it cleared the line of fire of the grand battery.  
The French kept going for a while because they could, throwing in some last desperate charges hoping the dice gods might be feeling guilty, but no dice.  Reduced to 2 divs verging on breaking the French conceded.


Wednesday, August 24, 2016

Turks v. Poles: Pike & Shot

Turks: Mike & Chris with 6 Jannisaries, 12 Levy infantry,  4 Skirmishers, 2 Sipahis of the Porte, 4 Gonallu, 4 Feudal Sipahis, 4 horse archers in 5 divisions.  Command Rating 8. 634 pts.

Poles: Jim with 8 Shot, 4 Pike, 8 Heavy cavlry, 4 Winged Hussars in 5 divisions.  Command Rating 9. 630 pts.

Rules: Hail Cromwell - our Renassaince era variant of Hail Caesar. 

Scenario: Encounter battle.  Mainly flat terrain with some patches of swampy ground.  Deployment was on map before placing on the table.
The Poles are on the near side.  They have deployed all their infantry on their left & all their cavalry on their right.
The Turks have their Janissaries on their right, their Sipahis on their left, the levies centre & left of centre and their Gonallu on their left.
The Poles got first move & then good command dice on the first turn and rush forward all along the line as the Turks do some serious thinking.
The Winged Hussars were supposed to sweep the Gonallu off the table, but blundered sideways & the Heavy Cavalry took the lead while the Gonullu put up a good fight covering the withdrawal of the levy infantry to their right.   The Sipahis are advancing on the far side while teh advance of the Jannissaries is held up by the need to go around a swamp.
The Polish foot have formed hedghogs to face off the Sipahis.  Their RH Heavy Cav have been replused, but Hussars have moved up to take over.
The Polish foot hold off the Sipahis as the Turks try to get their Jannisaries into the fray. The Hussars are finishing off the Gonallu.
The Jannisaries have finally deployed to support their cavalry on the far flank.  The Polish cavalry are hesitating in front of a storm of arrows. 
The Jannisaries have pushed the centre of the Polish foot back but their flanks are holding firm & the divisions are not in danger of breaking. The Polish cavalry have finally got some good command dice and its happy hour as they ride down the first levy infantry division.
The Turks have pulled the Sipahis back to try to meet the Polish Horse, but it's too late, the second Levy division has also been ridden down  in one charge of the Hussars & the Turks fail their Army Break Test with 3 of 5 divisions broken. 
Another view of the end from behind the Turkish position.

The Poles got the upper hand at the start with their deployment putting their powerful cavalry against the weakest enemy units while the Turks' best troops were restricted by the swamps & unable to get into decisive action before their left crumbled.

Monday, August 22, 2016

Muskets & Tomahawks at Barrie's

John ran his escort the convoy scenario again with 5 players.  John, Jim & Jason being French Canadians & Rusty & Dave British.  As I forgot my phone there are no pics, but it looked much the same as last time we played the scenario.  Once again the French won resulting in the usual British claims that the scenario is biased towards the French, while the French players preferred to point out the superiority of their tactics.

Tuesday, August 16, 2016

English Civil War: Hail Cromwell!

I had too busy a week to set anything up so we threw together a scenario with each army having 2 inf divs of 2 pike & 4 shot, 1 cav div of 4 horse & 2 small shot units. To make it interesting we kept a lot of the BA scenery last week on the table.   Mike command Royals, Jim Parliament.  Mark umpired.  NickB turned up late & watched the end.
 We used map deployement restricted to 18" from our own baselines.  Jim's Parliamentarians are on the near side.  Both sides predictably put their horse at this end & attached musketers at the far end.
 Mike seized the village while Jim tried to sweep around Mike's right flank.
Mike tried a pre-emptive stike at the Parl't foot, but they formed hedgehog.  The Roundhead horse failed command to take advantage (even with their CIC with them).
The Roundhead horse failed to charge home, but Parl'ts foot is hurting the enemy's right with converging fire, their pikes have charged in the centre & shotte on the woods covers their own right.
The Cavaliers have repelled the Roundhead horse, but have lost more casualties.   The Royalis pikes are making a desperate counterattack on the right of their line.
The Royalist foot are falling back all along the line.  The Roundhead horse remain reluctant to charge. 
The Roundhead horse eventually charged and routed the Cavaliers & are now galloping across the enemy's rear looking for prey that isn't in a wood or carrying pikes.  The Royalist foot in all on half strength & mostly shaken.  The end is near.
The Parliamenary pikes have been beaten off from the wood, but shot has completed the job of getting the centre div half broken & half shaken, so they break and with them the Royalist army breaks. Though with  the Roundhead cavalry div in the rear, not sure where to.

Tuesday, August 09, 2016

Bolt Action School

The usual suspects were otherwise engaged tonight, but NickB & newbies Sean & Matthew showed up.  I mentored Sean with my Regular Brits list while Nick mentored Matthew with one of my Veteran Panzergrenadier lists.   The scenario was basically the Tank War scenario, but modified with a deployment turn at the start to compensate for the larger than standard table.
The Brits are on the right, Germans on the left. There are 5 objectives - the croosroad, the exits of teh road from left to right & the two ridges at the far end.  The Brits are making a big push in the centre with some fire support on each flank.  The Germans are sending their 2 large Panzergrenadiers units forward in the centre with support on both flanks.  The Panzergrens have taken control of the centre objective putting the Germans in the box seat.
The British barrage did little, but they had one stroke of luck when their mortar immobilised the Stuh 42, but it rallied off the pins next turn, the mortar lost the range & the Stuh didn't need to move to find targets.  The British had to attack to get back an objective, but their attacks floundered in the face of the Germans firepower
The Brits continued making ever more desperate attacks in the village.  They eventually wore down the Panzergrens in the house & the Brit command team actually took the house in turn 5.  But they had no supports left & another Panzergren unit moved to keep the objective contested & thus still a German VP.  The Brits conceded at the end of turn 6.

Tuesday, August 02, 2016

Crusaders v. Heretics

Nick set up a scenario tonight based on Simon de Montfort's war in France.
Simon de Montfort is besieged off table behind the camera.  A relief force is at the far end of the table.  2 veteran crusader knights and 2 battles of infantry are escorting a supply train.  The heretics have raised the siege and are marching out to meet the relief force.  They to have a cavalry battle and 2 infantry battles - much larger than the relief force, but not as good a quality having both less combat power and poorer command.
Mike commands the heretic left, Steve commands their right.  Mark has the relief force's right and Chris their left. de Montfort wins if his supply train gets through, The heretics win if it is destroyed, Either side can lose by army break test. 
The crusader cavalry advance realistically impetuously ahead of their infantry.
(The cameraman now changes ends of the table).
The crusaders charge the heretic cavalry but their right flank infantry blunders off to the right.
The Crusader cavalry has some success, but was still in danger of being swamped when the umpire announced to everyone's surprise that Simon de Montfort (Jim's command) had galloped up from the seige and had arrived in the rear for the heretics with 2 more crusader cavalry units.
The infantry are now engaged on both flanks as de Montfort makes his presence felt in the centre.
On the left Chris is under pressure from weight of numbers as he presses forward to protect the cavalry's flank.  In the centre the heretic cavaly is being mopped up.   Mark has benefited from some cavalry support on the right and is pushing forward in front of the train.
de Montfort's cavalry turns left to help Chris out.   The train is left vulnerable by Mark's enthusiasum for blood, but poor heretic command keeps it safe.
Both heretic wings are now in danger of breaking, but de'Montfort's left and cavalry are getting pretty tired too.
In the end the heretics needed some hot dice to get out of trouble and they didn't get them.  Their right has broken and with it their army.  The train is also about to go off the table and provide a win for de Montfort that way.